Compare Image ด้วย Image Magick On Robotframework
- Jan 20, 2019
- 1 min read
หลายๆคนคงเคยได้ยินการ Verify image หรือ Compare image เพื่อเอามาใช้ในงาน Automate test กันมาบ้างแล้ว และมี Tools หลายๆตัวที่สามารถนำมาใช้งานได้ แต่วันนี้เราจะมาสอนใช้ Image magick tools ในการ Compare image เพื่อใช้ในการ Verify image on Robotframework
ก่อนเลย ทุกคนควรจะลง Image Magick ในเครื่องให้เรียบร้อย ซึ่งสามารถทำตามได้ตามลิ้งนี้
ทุกครั้งที่เรามีการ Verify Element เราควรที่จะมี Reference Element อยู่ในเครื่องอยู่แล้ว การ Verify Image ก็เช่นกัน เราควรมีรูปที่เป็น Reference Image เก็บไว้สำหรับ Compare กับ Actual Image
Step 1. สร้าง Folder และเก็บรูปที่เป็น Reference Image
Path : E:\\Robotframework\\Reference_Image\\OpenEN.png

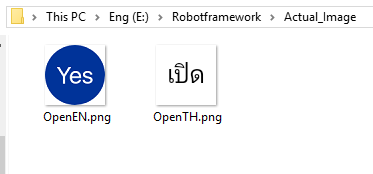
Step 2. สร้าง Folder และเก็บรูปที่ต้องการเอามา Compare กับ Reference Image
Path : E:\\Robotframework\\Actual_Image\\OpenEN.png

Step 3. เรามาเริ่มเขียนKeyword สำหรับใช้ในการ Compare image กันเลย
เราจะใช้คำสั่ง magick ที่เป็น command line โดยสั่งผ่าน Robotframework และ Return ค่ามาใช้ในการ Verify image
ค่า Output ที่ Return กลับมาจะมีค่าระหว่าง 0 - 1
0 คือ รูปภาพไม่ได้มีความแตกต่างเลยหรือก็คือ ภาพเหมือนกันนั้นเอง
1 คือ รูปทั้ง 2 แตกต่างกัน 100%
${Reference_Image_Path} : Path of Reference Image
${Actual_Image_Path} : Path of Actual Image
${width} , ${height} : ขนาดความกว้าง สูง ของรูปในการ Compare
${Allowed_Threshold} : ค่าความต่าง เพื่อในไปใช้ในการเช็ค Result
Keyword
Compare Images
[Arguments] ${Reference_Image_Path} ${Actual_Image_Path} ${width} ${height} ${Allowed_Threshold}=0.4
${COMMAND} Run Keyword If magick "${Reference_Image_Path}" "${Actual_Image_Path}" -resize "${width}"x"${height}" -metric RMSE -compare -format \ "%[distortion]" info:
Log Executing: ${COMMAND}
${RC} ${OUTPUT}= Run And Return Rc And Output ${COMMAND}
Log Return Code: ${RC}
Log Return Output: ${OUTPUT}
${RESULT} Evaluate ${OUTPUT} < ${Allowed_Threshold}
[Return] ${RESULT}

Test Case
Compare Image with Same Image


Compare Image with Difference Image


![[Tool]ASM Android Screen Monitor](https://static.wixstatic.com/media/9ba3b9_0f60667ce79e4e8698a93ded3177e686~mv2.png/v1/fill/w_447,h_250,fp_0.50_0.50,lg_1,q_35,blur_30,enc_avif,quality_auto/9ba3b9_0f60667ce79e4e8698a93ded3177e686~mv2.webp)
![[Tool]ASM Android Screen Monitor](https://static.wixstatic.com/media/9ba3b9_0f60667ce79e4e8698a93ded3177e686~mv2.png/v1/fill/w_220,h_123,fp_0.50_0.50,q_95,enc_avif,quality_auto/9ba3b9_0f60667ce79e4e8698a93ded3177e686~mv2.webp)
![[How-To]วิธีดู udid ของเครื่อง Android](https://static.wixstatic.com/media/9ba3b9_5b491ebcc32f471ca9a4aabd96d41832~mv2.png/v1/fill/w_447,h_250,fp_0.50_0.50,lg_1,q_35,blur_30,enc_avif,quality_auto/9ba3b9_5b491ebcc32f471ca9a4aabd96d41832~mv2.webp)
![[How-To]วิธีดู udid ของเครื่อง Android](https://static.wixstatic.com/media/9ba3b9_5b491ebcc32f471ca9a4aabd96d41832~mv2.png/v1/fill/w_220,h_123,fp_0.50_0.50,q_95,enc_avif,quality_auto/9ba3b9_5b491ebcc32f471ca9a4aabd96d41832~mv2.webp)
![[Tool] UI Automator Viewer](https://static.wixstatic.com/media/9ba3b9_effe26d321544e478df8d306901cccc1~mv2.png/v1/fill/w_447,h_250,fp_0.50_0.50,q_35,blur_30,enc_avif,quality_auto/9ba3b9_effe26d321544e478df8d306901cccc1~mv2.webp)
![[Tool] UI Automator Viewer](https://static.wixstatic.com/media/9ba3b9_effe26d321544e478df8d306901cccc1~mv2.png/v1/fill/w_220,h_123,fp_0.50_0.50,q_95,enc_avif,quality_auto/9ba3b9_effe26d321544e478df8d306901cccc1~mv2.webp)


![[Python] TypeError: String indices must be integers By Adding Pytest-runner](https://static.wixstatic.com/media/9f1b00_e1685a26d4214fdeb150a0008671b87b~mv2.jpg/v1/fill/w_274,h_250,fp_0.50_0.50,q_30,blur_30,enc_avif,quality_auto/9f1b00_e1685a26d4214fdeb150a0008671b87b~mv2.webp)
![[Python] TypeError: String indices must be integers By Adding Pytest-runner](https://static.wixstatic.com/media/9f1b00_e1685a26d4214fdeb150a0008671b87b~mv2.jpg/v1/fill/w_69,h_63,fp_0.50_0.50,q_90,enc_avif,quality_auto/9f1b00_e1685a26d4214fdeb150a0008671b87b~mv2.webp)
![[Python] TypeError: String indices must be integers By Fixing Damaged Packages](https://static.wixstatic.com/media/9f1b00_48a23fd1b86d4becae687ec4bc2a99f0~mv2.png/v1/fill/w_442,h_250,fp_0.50_0.50,lg_1,q_35,blur_30,enc_avif,quality_auto/9f1b00_48a23fd1b86d4becae687ec4bc2a99f0~mv2.webp)
![[Python] TypeError: String indices must be integers By Fixing Damaged Packages](https://static.wixstatic.com/media/9f1b00_48a23fd1b86d4becae687ec4bc2a99f0~mv2.png/v1/fill/w_69,h_39,fp_0.50_0.50,q_95,enc_avif,quality_auto/9f1b00_48a23fd1b86d4becae687ec4bc2a99f0~mv2.webp)


Comments